NICE pay 연동 - 01
개발하게 된 이유
회사 앱 개발을 하면서 결제 서비스가 필요한 상황이었음. 개발자가 기존 회사에서 활용하던 iamport의 라이브러리를 사용하여 개발을 진행함. 상품을 판매하는 협력사에서 수수료가 비싸다고 PG사와 직접 연동하여 개발해달라고 요청이 들어옴. 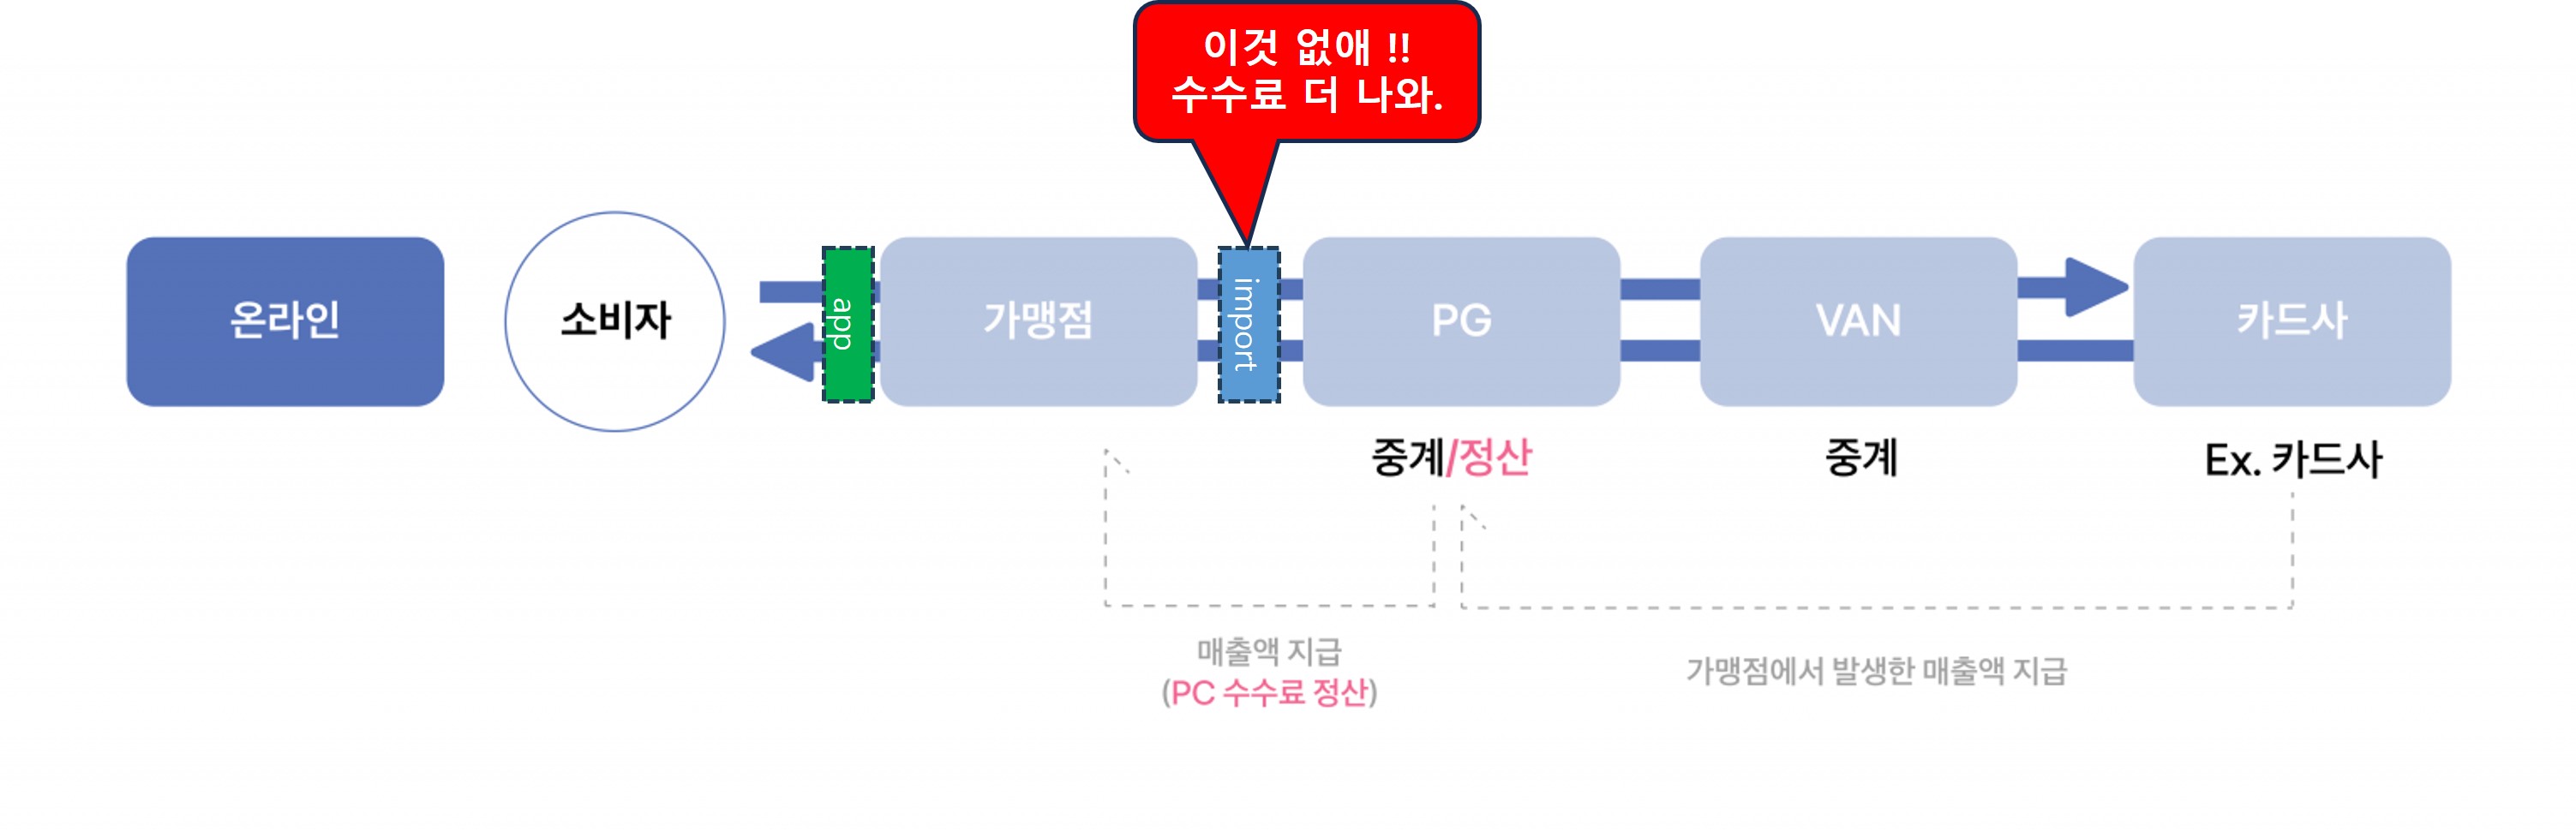
PG 연동
PG가 뭐지?
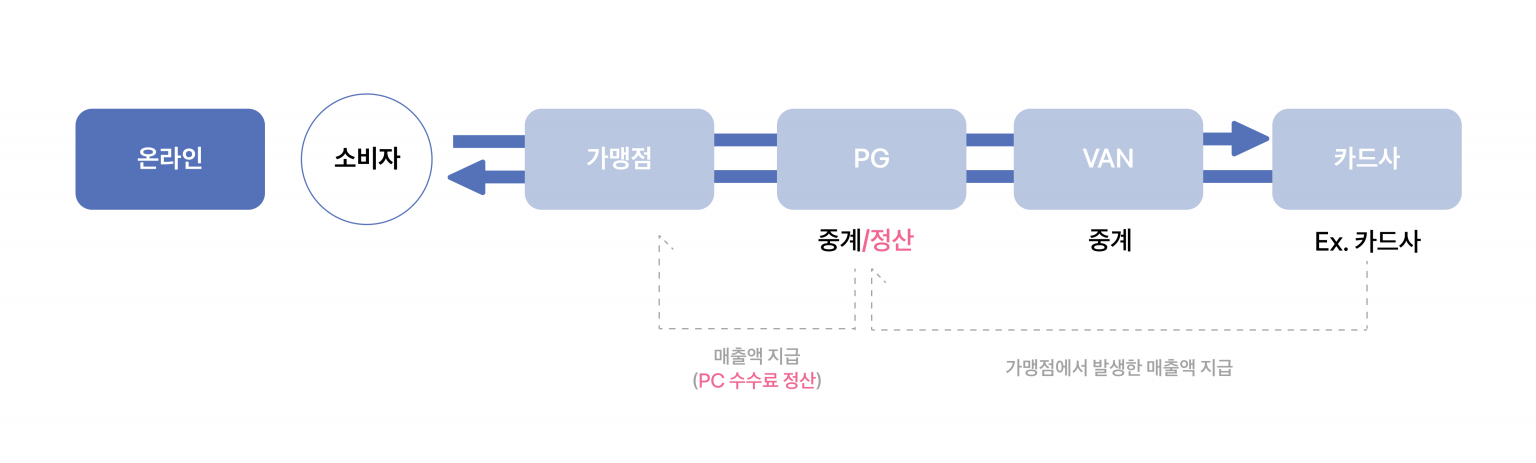
Payment Gateway. PG사는 온라인 상거래에서 결제 처리를 위한 시스템을 제공하는 회사. PG사는 상인과 고객 사이에서 결제 정보를 전달하고, 신용카드나 체크카드 등의 결제 수단을 사용하여 실제 결제를 처리하는 역할 수행. PG사는 신용카드 회사와은행과 협력하여 결제 처리를 담당하며, 상점의 웹사이트나 앱에 통합되어 사용됨.
그럼 VAN은?
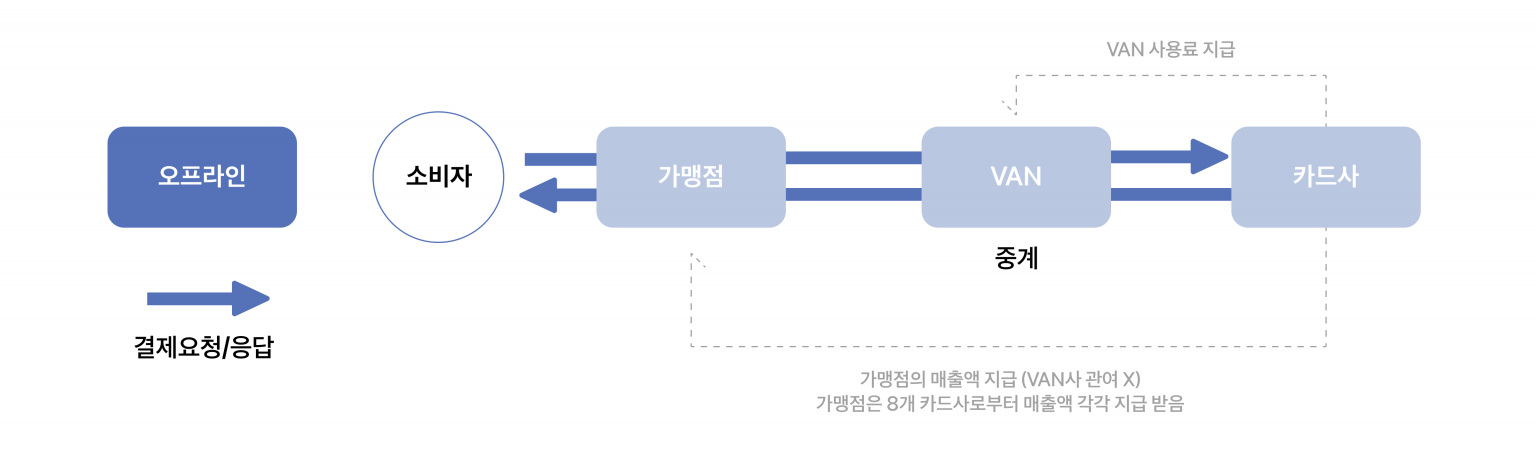
Value Added Network. VAN사는 전자 데이터 통신 서비스를 제공하는 회사를 가리킨다. 주로 전자 금융 트랜잭션을 위한 통신 네트워크를 구축하고 운영함. VAN사는 상인과 신용카드 처리 회사, 은행 등 각종 금융 기관 사이의 통신을 담당하여 결제 정보와 금융 데이터를 안전하고 신속하게 교환할 수 있도록 지원함. 주로 신용카드 승인 요청과 응답, 전자 데이터 교환 등에 사용됨.
PG와 VAN 차이점
가장 큰 차이는 ‘수수료’
VAN사는 가맹점에게 수수료를 받지 않고, 카드사로부터 수수료를 받으나, PG사는 오히려 PG사가 카드사에 수수료를 내고 결제를 연동하는 구조임. 당연히 PG사의 ‘수수료’가 높을 수 밖에 없음.
NICE payment workflow
Server 승인 모델과 Client 승인 모델의 두 종류가 존재한다. 여기서 주의할 점은 returnUrl이다. 안드로이드/iOS의 앱은 서버가 아님!!
승인 결과를 받기위해서는 url이 필요…. 즉, 웹서버가 필요하다는 것.
Server 승인 모델 - 결제창

Client 승인 모델 - 결제창

Flutter에서 NICEPay 연동
PG사인 NICEPay에서는 온라인결제를 위한 개발 가이드를 메뉴얼로 제공하고 있음. “Node.js”, “Python”, “Ruby”, “ASP”, “JAVA”, “PHP”, “.NET” 샘플 코드를 제공함.
그런데… flutter는 없네!!!
flutter를 위한 메뉴얼 또는 라이브러리를 제공하지 않고 있어, 이 글을 작성하게 됨
flutter에서 결제 연동을 위해서는 다음과 같은 개발을 할 수 있어야 함.
첫째, 웹 서버 프로그램 작성. 둘째, 당연히 flutter 작성. 셋째, 안드로이드와 iOS 네이티브 작성.
결론적으로 jsp, js, dart/flutter, swift, kotlin/java에 대한 지식이 있어야 함. ㅡ_ㅡa
1. 웹 서버 프로그램
기존에 회사 내에서 사용하던 “본인인증”용 웹서버를 같이 활용하기로 결정.
Flutter 앱에서 웹 서버로 결제정보를 호출하면, NicePay 결제창을 활성화한다. 카드 결제만 수용한다.
1) Controller
기존 사용하고 있던 소스에서 Spring Controller를 추가하고 model&view 방식으로 처리하였다.
NicePay와 관련한 계정 정보 등은 application.properties 파일에 설정.
app에서 결제 정보를 POST로 보내면 model에 attributes로 추가하여, JSP 페이지를 로딩한다. flutter에서는 webview로 해당 페이지로 NicePay 결제창과 연동하게 된다.
payment 메소드에서 결제 요청을 받고, resultPayment에서 결제 결과를 받는다.
1
2
3
4
5
6
7
8
9
10
11
12
13
14
15
16
17
18
19
20
21
22
23
24
25
26
27
28
29
@Controller
public class NicepayController {
    @Value("${nicepay.merchantid}")
    private String merchantID;
    @Value("${nicepay.merchantkey}")
    private String merchantKey;
    @Value("${nicepay.merchanturl}")
    private String merchantUrl;

    @RequestMapping(value = "/payment", method = RequestMethod.POST)
    public String payment(Model model, HttpServletRequest req){
        model.addAttribute("orderId", UUID.randomUUID().toString());
        model.addAttribute("merchantId", merchantID);
        model.addAttribute("merchantKey", merchantKey);
        model.addAttribute("merchantUrl", merchantUrl);
        model.addAttribute("goodsName", req.getParameter("goodsName"));
        model.addAttribute("price", req.getParameter("price"));
        model.addAttribute("buyerName", req.getParameter("buyerName"));
        model.addAttribute("buyerTel", req.getParameter("buyerTel"));
        return "payment";
    }

    @RequestMapping("/payment/result")
    public String resultPayment(Model model, HttpServletRequest request){
        model.addAttribute("merchantKey", merchantKey);
        model.addAttribute("merchantUrl", merchantUrl);
        return "payment_result";
    }
}
2) JSP
JSP 페이지는 NicePay에서 제공한 source를 수정하여 사용하였다.
NicePay의 JSP 소스는 여기를 참고하면 되고, 아래에 수정된 중요 부분만 발췌하여 설명한다.
- payment.jsp –> 결제 요청 처리
- payment_result.jsp –> 결제 결과 처리
첫번째, payment.jsp에서 Controller로 전달받은 결제정보를 Form에 보낼 변수에 할당하도록 수정하였다. request.getAttribute()로 데이터를 변수에 할당한다.
1
2
3
4
5
6
7
8
9
10
11
12
13
14
15
16
17
18
19
20
<%
/*
*******************************************************
* <결제요청 파라미터>
* 결제시 Form 에 보내는 결제요청 파라미터입니다.
* 샘플페이지에서는 기본(필수) 파라미터만 예시되어 있으며,
* 추가 가능한 옵션 파라미터는 연동메뉴얼을 참고하세요.
*******************************************************
*/
String merchantUrl      = (String)request.getAttribute("merchantUrl");
String merchantID 		= (String)request.getAttribute("merchantId"); 				// 상점아이디
String merchantKey 		= (String)request.getAttribute("merchantKey"); 				// 상점키
String goodsName 		= (String)request.getAttribute("goodsName"); 				// 결제상품명
String price 			= (String)request.getAttribute("price"); 					// 결제상품금액
String buyerName 		= (String)request.getAttribute("buyerName"); 				// 구매자명
String buyerTel 		= (String)request.getAttribute("buyerTel"); 				// 구매자연락처
//String buyerEmail 		= "happy@day.co.kr"; 									// 구매자메일주소
String moid 			=  (String)request.getAttribute("orderId"); 				// 상품주문번호
String returnURL 		= merchantUrl + "/payment/result";
...
두번째, payment.jsp에서 NicePay 결제창 처리를 위해 아래와 같이 수정
- 페이지 로딩시에 즉시 결제창을 요청하도록 <body onload="nicepayStart()">를 추가하였다.
- 결제 내역을 사용자에게 보여줄 필요가 없어 style=”display:none”을 추가하였다.
- form의 action을 서버에서 가져온 url로 매핑하였다. action=”${merchantUrl}/payment/result”
1
2
3
4
5
6
7
8
9
10
11
12
13
14
15
16
17
18
<script type="text/javascript">
//결제창 최초 요청시 실행됩니다.
function nicepayStart(){
	if(checkPlatform(window.navigator.userAgent) == "mobile"){//모바일 결제창 진입
		document.payForm.action = "https://web.nicepay.co.kr/v3/v3Payment.jsp";
		document.payForm.acceptCharset="euc-kr";
		document.payForm.submit();
	}else{//PC 결제창 진입
		goPay(document.payForm);
	}
}
...
</script>
</head>
<body onload="nicepayStart()">
<div style="display:none">
	<form name="payForm" method="post" action="${merchantUrl}/payment/result" accept-charset="euc-kr">
...
세번째, payment_result.jsp에서 window.flutter_inappwebview.callHandler를 사용하여, 결제결과 정보를 flutter webview로 보내도록 구현한다.
1
2
3
4
5
6
7
8
9
10
11
12
13
14
15
16
17
18
19
20
21
22
23
24
25
<script>
	window.onload = pageLoad;

	function pageLoad(){
		// 결제 결과값을 JSON 형태로 생성
		var payResult = {
			paySuccess: window.document.getElementById('paySuccess').textContent,
			payMethod: window.document.getElementById('payMethod').textContent,
			tid: window.document.getElementById('tid').textContent,
			totalAmount: window.document.getElementById('amount').textContent,
			cardName: window.document.getElementById('cardName').textContent,
			cardNo: window.document.getElementById('cardNo').textContent,
			cardQuota: window.document.getElementById('cardQuota').textContent,
		}

		// flutter_inappwebview 라이브러리의 callHandler 함수를 사용하여, 결과값 전달
		window.addEventListener("flutterInAppWebViewPlatformReady", function(event) {
			if (window.flutter_inappwebview.callHandler) {
				window.flutter_inappwebview.callHandler('NicepayHandler', JSON.stringify(payResult));
			}else{
				window.flutter_inappwebview._callHandler('NicepayHandler', JSON.stringify(payResult));
			}
		});
	}
</script>
2. Flutter
flutter_inappwebview 플러그인을 사용하여, nicepay 결제창 처리를 한다. 여기에서는 위의 서버에 작성한 /payment 컨트롤러를 호출하여 nicepay 결제창을 webview에 표시되게 한다.
inappwebview에서 아래와 같은 기능을 구현한다.
- javascript handling : 최종 nicepay 결과를 javacript로 수신하여 처리하는 작업 수행
- 다른 앱 실행 처리를 위한 MethodChannel 구현 : 웹이 아닌 android나 iOS app을 실행하는 경우 처리.
첫째, InAppWebView를 생성하면서, initialUrlRequest 속서에 위의 1번 개발된 서버의 요청 URL을 설정한다.
또한 onWebViewCreated에 javascript handler를 추가하여, payment_result.jsp에서 window.addEventListener로 결제 결과를 수신할 수 있게 구현한다.
둘째, shouldOverrideUrlLoading에서 nicepay 결제창의 url을 확인하여, http/https가 아닌 요청에 대해 MethodChannel을 호출한다. 여기에서는 getAppUrl(requestUrl);로 구현됨.
1
2
3
4
5
6
7
8
9
10
11
12
13
14
15
16
17
18
19
20
21
22
23
24
25
26
27
28
29
30
31
32
33
34
35
36
37
38
39
40
41
42
43
44
45
46
47
48
49
50
51
52
53
54
55
56
57
58
59
60
61
62
63
64
65
66
67
68
69
70
71
72
73
74
75
 @override
  Widget build(BuildContext context) {
    var shoppingController = Get.put(GetShoppingsController());

    return Scaffold(
        appBar: LeadingAppBar(
          appBar: AppBar(),
          title: 'NICE 결제',
        ),
        body: SafeArea(
          child: InAppWebView(
            initialUrlRequest: URLRequest(
              url: Uri.parse(
                '위의 개발한 서버의 요청 URL/payment',
              ),
              body: Uint8List.fromList(
                utf8.encode(
                  getRequestBody(shoppingController),  // 요청 데이터
                ),
              ),
              method: 'POST',
              headers: {
                'Content-Type': 'application/x-www-form-urlencoded',
              },
            ),
            initialOptions: options,
            onWebViewCreated: (controller) {
              controller.addJavaScriptHandler(
                  handlerName: 'NicepayHandler',
                  callback: (arguments) {
                    Map<String, dynamic> resp = jsonDecode(arguments[0]);
                    if (resp['paySuccess'] == 'true') {
                      Map<String, dynamic> param = {};
                      param['reportSeq'] = shoppingController.reportSeq.value;
                      param['addrSeq'] = shoppingController.addrSeq.value;
                      param['impUid'] = resp['tid'];
                      List<dynamic> prdAmountList = [];
                      for (var i = 0;
                          i < shoppingController.prdList.length;
                          i++) {
                        var prd = shoppingController.prdList[i];
                        prdAmountList.add({
                          'prdKey': prd['prdKey'],
                          'payAmount': prd['amount']
                        });
                      }
                      param['prdAmountList'] = prdAmountList;

                      postBuysApi(param, context);
                    } else {
                      Get.back(result: resp);
                    }
                  });
            },
            shouldOverrideUrlLoading: (controller, navigationAction) async {
              String requestUrl = navigationAction.request.url.toString();
              debugPrint('웹뷰 [onUpdateVisitedHistory]: $requestUrl');

              if (!requestUrl.startsWith('http') &&
                  !requestUrl.startsWith('https')) {
                if (Platform.isAndroid) {
                  getAppUrl(requestUrl);
                  return NavigationActionPolicy.CANCEL;
                } else if (Platform.isIOS) {
                  await launchUrl(
                    Uri.parse(requestUrl),
                  );
                  return NavigationActionPolicy.CANCEL;
                }
              }
              return NavigationActionPolicy.ALLOW;
            },
          ),
        ));
  }
결제 요청 파라미터 생성과, MethodChannel 호출 소스는 아래와 같다.
1
2
3
4
5
6
7
8
9
10
11
12
13
14
15
16
17
18
19
20
21
22
23
24
25
26
27
28
...
  /// 결제 요청 파라미터
  String getRequestBody(GetShoppingsController controller) {
    String result = "";
    result += "goodsName=${controller.prdName.value}";      // 상품명
    result += "&price=${controller.payAmount.value}";       // 결제금액
    result += "&buyerName=${controller.buyerName.value}";   // 결제자 이름
    result += "&buyerTel=${controller.buyerTel.value}";     // 결제자 전화번호
    return result;
  }

  /// 앱 실행 및 설치 MethodChannel 호출
  Future getAppUrl(String url) async {
    await platform.invokeMethod('getAppUrl', <String, Object>{'url': url}).then(
        (value) async {
      debugPrint('paring url : $value');

      if (await canLaunchUrl(Uri.parse(value))) {
        await launchUrl(
          Uri.parse(value),
        );
        return;
      } else {
        debugPrint('이동 불가능한 URL입니다.');
        return;
      }
    });
  }
3. Android MainActivity
configureFlutterEngine(flutterEngine: FlutterEngine) 함수에서 MethodChannel 처리를 한다. methodCall.method == “getAppUrl”인 경우, startSchemeIntent(url) 호출하여, android 앱을 실행하거나, 마켓으로 이동하도록 한다.
1
2
3
4
5
6
7
8
9
10
11
12
13
14
15
16
17
18
19
20
21
22
23
24
25
26
27
28
29
30
31
32
33
34
35
36
37
38
39
40
41
42
43
44
45
46
47
48
49
50
51
52
53
54
55
56
57
58
59
...
    override fun configureFlutterEngine(flutterEngine: FlutterEngine) {
        super.configureFlutterEngine(flutterEngine)

        GeneratedPluginRegistrant.registerWith(flutterEngine)

        val handler =
            MethodChannel.MethodCallHandler { methodCall: MethodCall, result: MethodChannel.Result ->
                if (methodCall.method == "getPlatformVersion") {
                    result.success("Android Version: " + Build.VERSION.RELEASE)
                } else if (methodCall.method == "coocon") {
                    var inString = methodCall.arguments.toString()
                    var resp = sasManager.run(0, inString)
                    result.success(resp)
                } else if (methodCall.method == "getAppUrl") {
                    try {
                        val url: String = methodCall.argument("url")!!
                        println("url: " + url)
                        startSchemeIntent(url)
                        //result.success(intent.dataString)
                    } catch (e: URISyntaxException) {
                        result.notImplemented()
                    } catch (e: ActivityNotFoundException) {
                        result.notImplemented()
                    }
                } else {
                    result.notImplemented()
                }
            }
        channel = MethodChannel(flutterEngine.dartExecutor, CHANNEL)

        channel!!.setMethodCallHandler(handler)
    }

    /*Intent 스킴을 처리하는 함수*/
    fun startSchemeIntent(url: String): Boolean {
        val schemeIntent: Intent = try {
            Intent.parseUri(url, Intent.URI_INTENT_SCHEME) // Intent 스킴을 파싱
        } catch (e: URISyntaxException) {
            return false
        }
        try {
            startActivity(schemeIntent) // 앱으로 이동
            return true
        } catch (e: ActivityNotFoundException) { // 앱이 설치 안 되어 있는 경우
            val packageName = schemeIntent.getPackage()

            if (!packageName.isNullOrBlank()) {
                startActivity(
                    Intent(
                        Intent.ACTION_VIEW,
                        Uri.parse("market://details?id=$packageName") // 스토어로 이동
                    )
                )
                return true
            }
        }
        return false
    }